

Showing posts with label DIY. Show all posts
Showing posts with label DIY. Show all posts
Monday, August 13, 2012
Sweet Pea Special
Monday, March 28, 2011
Dual Flush Throne
I thought it would be great to get back into my regular blog schedule by posting another 'How To'. I love doing things around the house. I know that most people say, "Why don't you just let you husband do that?" But I just simply reply that I should know how to do these things for when he's not available. Plus, (I love you Dad!) I grew up in a house that when something needed to be done by 'a man', that it would usually sit for weeks until either enough nagging or enough time had lapsed for it to become a priority. I personally am a 'take matters into your own hands' kind of person. So even though The Raconteur Daddy is perfectly capable of doing these 'masculine' tasks around the house, I find it very empowering as a woman to be able to do them too. AND I love being able to show all of you how easy some of these things can be!
It's very interesting how the progression of things go around our house.....usually one thing leads to another. Last month, right at the start of the Under Cover Event, our daughter's bathroom toilet flapper connector that leads to the handle broke. So, RacDad headed out to Home Depot to buy a new one (preferably one with a chain and not a rubber connector like the old one.) When he came back, I decided that I wanted to put it in. This wasn't the first time I've dealt with toilet flappers. It was easy enough and as I was finishing, I decided to clean the toilet and to readjust the fill so that it would actually go to the line and not over like it had for years. SUCCESS! I now have a perfectly filling and functional toilet in Sweet Pea's bathroom.
I thought that since I was at it (and being so proud too), I might as well clean and readjust the levels in my own bathroom. So I got to work. The minute I opened the back of the toilet, I realized that the fill valve arm that attaches to the ball was so rusted and corroded. When I touched it, it immediately disintegrated in my hand. OH NO! I shut off the water to the toilet and sent RacDad back to Home Depot.....again. Since we needed to replace the whole fill valve (you can't just buy a metal arm because that would be too easy), we decided to invest the extra $20 and convert this one to a Dual Flush! Why, you ask? Well, because I like the idea of water conservation and this is a cost effective way to do it. Here's the story of my adventure!
This is the valve and dual flush conversion kit that we chose. So far, we are very happy with it. It was very easy to install and it was very reasonably priced!
To start, you have to turn off the water valve going to the toilet. Then you have to drain the toilet of the water as best you can. Now, new toilet fill valves do not come with the traditional arm and ball float. Instead, they come with a float assembly that goes around the valve. You have to have one of these to be able to use a dual flush mechanism.
Next, you have to put a bowl and towel or something underneath the water valve that goes to the toilet to catch the excess water in the bottom of the bowl. (Now would be a good time to install a diaper sprayer too!) Then, you unscrew the base of the water line and the base of the old fill valve. Remove the old fill valve by lifting it out. It's as easy as that!

The next step in this process is to install the new fill valve. It's as simple as adjusting the valve to the correct height and screwing the base in.
Now, one thing to remember with this particular model is that the very top blue part can be taken off to adjust the angle of the float. I had to do this because I found that the float rubbed against the side of the tank and therefore, wouldn't fill correctly. If you have to do this, please remember to screw the top back on securely before turning the water on! Here is what happens if you don't.
After cleaning up a few gallons of water off the floor and walls, I got started on installing the dual flush conversion kit. (I was glad that this happened because I had been saying for months that we needed to clean the walls!) If you only need to install the flush valve, then you are done. Just connect the flapper.
Now, like most guys, I tend to just jump in and leave the directions on the counter unless I get stuck. I think that this company banked on people like that, because there were two places where I probably should have looked ahead. The first successfully cleaned my entire bathroom, ceiling and all. The second is coming up. Luckily, they included the extra little part so you could do it right, the second time.
So, the next step is to take out the old flapper and the handle. Then you install the base of the dual flush valve where the flapper was. You have to fit it around the fill tube and secure it with the zip tie. If you have extra space, there is a wedge that you can put in to make it tight...this is where the second zip tie comes in handy in case you tighten the first one and need to cut it off to fix it. Then you screw the rest of the dual flush valve onto the base.
All in all, including clean up time, this only took 1 hour from start to finish. It probably would have been 20 minutes if it hadn't have been for the water issue and the time it took for my husband to stop laughing and telling me that he just had to take a picture of me. So, I think that all of you would be able to try this out. I think it's a great idea. The unit will pay for itself in a short period of time. Plus, you will be effectively saving the earth, one flush (or half flush) at a time!


It's very interesting how the progression of things go around our house.....usually one thing leads to another. Last month, right at the start of the Under Cover Event, our daughter's bathroom toilet flapper connector that leads to the handle broke. So, RacDad headed out to Home Depot to buy a new one (preferably one with a chain and not a rubber connector like the old one.) When he came back, I decided that I wanted to put it in. This wasn't the first time I've dealt with toilet flappers. It was easy enough and as I was finishing, I decided to clean the toilet and to readjust the fill so that it would actually go to the line and not over like it had for years. SUCCESS! I now have a perfectly filling and functional toilet in Sweet Pea's bathroom.
I thought that since I was at it (and being so proud too), I might as well clean and readjust the levels in my own bathroom. So I got to work. The minute I opened the back of the toilet, I realized that the fill valve arm that attaches to the ball was so rusted and corroded. When I touched it, it immediately disintegrated in my hand. OH NO! I shut off the water to the toilet and sent RacDad back to Home Depot.....again. Since we needed to replace the whole fill valve (you can't just buy a metal arm because that would be too easy), we decided to invest the extra $20 and convert this one to a Dual Flush! Why, you ask? Well, because I like the idea of water conservation and this is a cost effective way to do it. Here's the story of my adventure!
This is the valve and dual flush conversion kit that we chose. So far, we are very happy with it. It was very easy to install and it was very reasonably priced!
 |
| As you can see, there's only a stub left to the arm that the ball attaches to. |
To start, you have to turn off the water valve going to the toilet. Then you have to drain the toilet of the water as best you can. Now, new toilet fill valves do not come with the traditional arm and ball float. Instead, they come with a float assembly that goes around the valve. You have to have one of these to be able to use a dual flush mechanism.
 |
| The blue thing is the float. |
 |
| Just unscrew. |
 |
| Old fill valve is gone. |

The next step in this process is to install the new fill valve. It's as simple as adjusting the valve to the correct height and screwing the base in.
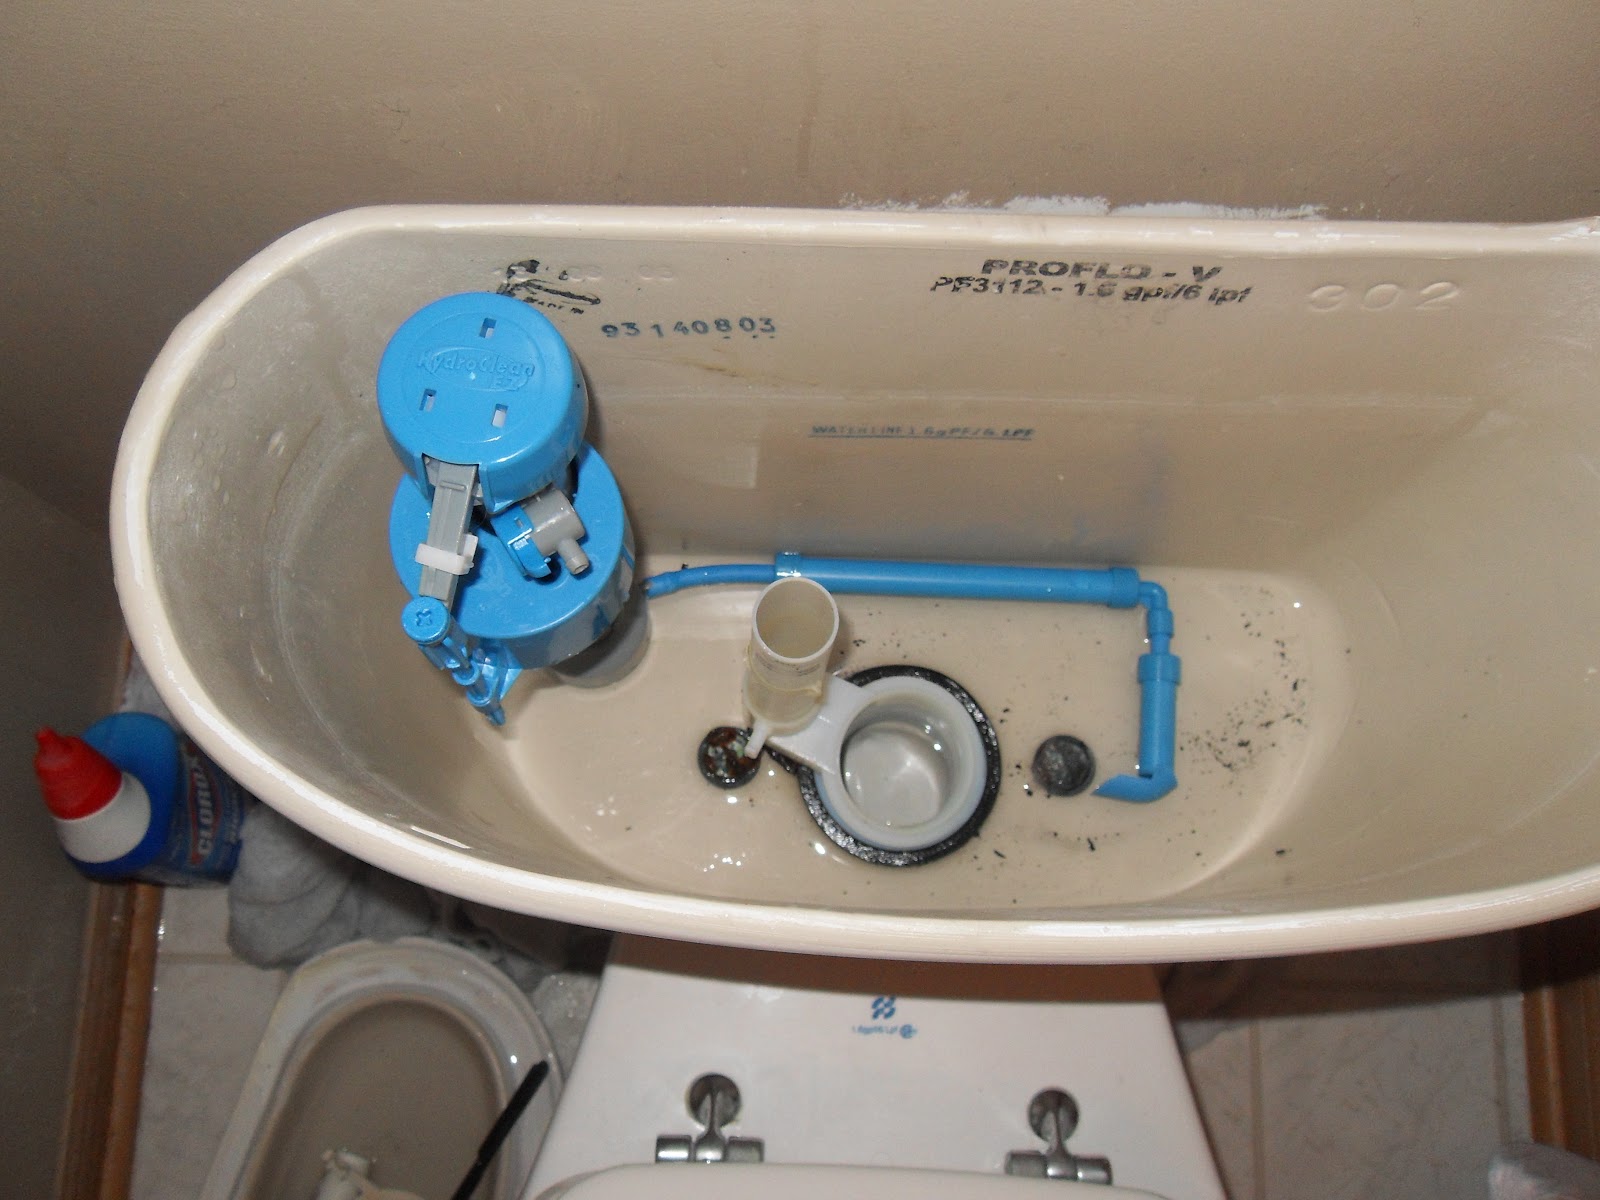 |
| Adjusted and ready to go! |
 |
| Screw tight by hand. |
Now, one thing to remember with this particular model is that the very top blue part can be taken off to adjust the angle of the float. I had to do this because I found that the float rubbed against the side of the tank and therefore, wouldn't fill correctly. If you have to do this, please remember to screw the top back on securely before turning the water on! Here is what happens if you don't.
 |
| Water shot straight out of the top! |
 |
| All over the ceiling... |
 |
| And all over me....what a mess! |
After cleaning up a few gallons of water off the floor and walls, I got started on installing the dual flush conversion kit. (I was glad that this happened because I had been saying for months that we needed to clean the walls!) If you only need to install the flush valve, then you are done. Just connect the flapper.
Now, like most guys, I tend to just jump in and leave the directions on the counter unless I get stuck. I think that this company banked on people like that, because there were two places where I probably should have looked ahead. The first successfully cleaned my entire bathroom, ceiling and all. The second is coming up. Luckily, they included the extra little part so you could do it right, the second time.
 |
| Dual flush converter to use instead of a flapper. |
 |
| Extra part. They were thinking ahead! |
So, the next step is to take out the old flapper and the handle. Then you install the base of the dual flush valve where the flapper was. You have to fit it around the fill tube and secure it with the zip tie. If you have extra space, there is a wedge that you can put in to make it tight...this is where the second zip tie comes in handy in case you tighten the first one and need to cut it off to fix it. Then you screw the rest of the dual flush valve onto the base.
 |
| Base of Dual Flush Valve. |
 |
| Base put in around fill tube. |
 |
| Dual flush valve secured on base. |
Next, you install the new dual flush button where the old handle was. Then, you hook up the water line from the flush valve to the fill tube. You can then adjust the water flow and levels as needed. VIOLA! You're done!
 |
| Button installed. |
 |
| Oooo....pretty. |
 |
| Finished from the inside view. |
 |
| All done. |
All in all, including clean up time, this only took 1 hour from start to finish. It probably would have been 20 minutes if it hadn't have been for the water issue and the time it took for my husband to stop laughing and telling me that he just had to take a picture of me. So, I think that all of you would be able to try this out. I think it's a great idea. The unit will pay for itself in a short period of time. Plus, you will be effectively saving the earth, one flush (or half flush) at a time!

Labels:
DIY,
dual flush conversion,
how to,
plumbing,
toilet repair


Monday, December 20, 2010
Baby, it's cold outside!
Winter is officially here. We have a small dusting of snow that won't go away, even on sunny days. I also had to start dripping the bathroom sink so the pipes don't freeze with the cold wind blowing around the house at night. My creative streak starts to itch as it gets closer to Christmas....but never early enough to actually make Christmas presents for anyone. So my good intentions usually get pushed aside with the hustle and bustle of the season. My son has started moving around in his bed at night and losing his blanket. This would make him get cranky, so I'd have to go in, swaddle him up and get him back to sleep again.
So one morning, as I was trying to get back to sleep at 4 am, listening to the wind whip around the house; I started thinking about remedies to this predicament that I had found myself in. I remembered that I had a multitude of fleece blankets all over the house. They are stashed in closets, cupboards, armories, and on the backs of couches and chairs. I was also thinking about how absurd it was to sell baby sacks for $40 a pop! As I laid there, I realized that the solution to my problem was a baby sleep sack. Since I am very frugal, I decided that I would just have to make one of my own. Plus, I could put some use to those extra blankets laying around the house! Here is my step by step creative way of using things around the house to create my own baby sleep sack.
I started by getting out one of my son's footed pajama sleepers. I unrolled some wrapping paper. (I usually use butcher paper to trace patterns, but I didn't have any. Plus I had been wrapping Christmas presents that morning and thought that it was quite the creative solution.) I laid the sleeper on top of the backside of the paper. I traced an extra 3-5 inches around the bottom and up the sides.
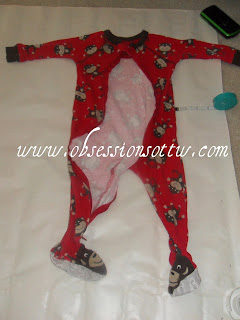
I traced 2 inches under the arms and around the yolk. Then I made the straps 2 inches wide by 6 inches long. I cut it out and this was my pattern!


I laid the blanket out on the floor and found that I could make 3 full sacks with it (6 pieces cut out). I laid the pattern on top and cut out the first piece. Then I took that piece and used it to cut out the remaining pieces. The reason I did this is because the fleece would stick together as I cut, so it was less of a hassle than trying to hold the paper in place because I really hate to pin.


Then I took two pieces and put them on top of each other with the outside facing in. I sewed from one arm, around the bottom, to the other arm. I turned it inside out and Viola! It was done!

Here is the finished product. I thought about using buttons on the straps (and I might as he gets bigger), but when I tried it on him I found that it was much easier to just tie the straps. He absolutely loves them and hasn't woken up in the middle of the night since we started using them. The whole thing from making the pattern to finished product only took less than an hour to do. I was amazed with how easy it is. You could easily add a zipper or buttons if you choose, but this works very well.

If you don't feel like the creative type, but want to get a sleep sack for your little one; I did find a great deal on Amazon for them. Halo Innovations SleepSack Wearable Blankets Micro Fleece in Baby Blue - Medium Or I could just make some for you!
So one morning, as I was trying to get back to sleep at 4 am, listening to the wind whip around the house; I started thinking about remedies to this predicament that I had found myself in. I remembered that I had a multitude of fleece blankets all over the house. They are stashed in closets, cupboards, armories, and on the backs of couches and chairs. I was also thinking about how absurd it was to sell baby sacks for $40 a pop! As I laid there, I realized that the solution to my problem was a baby sleep sack. Since I am very frugal, I decided that I would just have to make one of my own. Plus, I could put some use to those extra blankets laying around the house! Here is my step by step creative way of using things around the house to create my own baby sleep sack.
I started by getting out one of my son's footed pajama sleepers. I unrolled some wrapping paper. (I usually use butcher paper to trace patterns, but I didn't have any. Plus I had been wrapping Christmas presents that morning and thought that it was quite the creative solution.) I laid the sleeper on top of the backside of the paper. I traced an extra 3-5 inches around the bottom and up the sides.

I traced 2 inches under the arms and around the yolk. Then I made the straps 2 inches wide by 6 inches long. I cut it out and this was my pattern!


I laid the blanket out on the floor and found that I could make 3 full sacks with it (6 pieces cut out). I laid the pattern on top and cut out the first piece. Then I took that piece and used it to cut out the remaining pieces. The reason I did this is because the fleece would stick together as I cut, so it was less of a hassle than trying to hold the paper in place because I really hate to pin.


Then I took two pieces and put them on top of each other with the outside facing in. I sewed from one arm, around the bottom, to the other arm. I turned it inside out and Viola! It was done!

Here is the finished product. I thought about using buttons on the straps (and I might as he gets bigger), but when I tried it on him I found that it was much easier to just tie the straps. He absolutely loves them and hasn't woken up in the middle of the night since we started using them. The whole thing from making the pattern to finished product only took less than an hour to do. I was amazed with how easy it is. You could easily add a zipper or buttons if you choose, but this works very well.

If you don't feel like the creative type, but want to get a sleep sack for your little one; I did find a great deal on Amazon for them. Halo Innovations SleepSack Wearable Blankets Micro Fleece in Baby Blue - Medium
Or I could just make some for you!
Labels:
DIY,
how to,
sleep sack
Subscribe to:
Posts (Atom)