So one morning, as I was trying to get back to sleep at 4 am, listening to the wind whip around the house; I started thinking about remedies to this predicament that I had found myself in. I remembered that I had a multitude of fleece blankets all over the house. They are stashed in closets, cupboards, armories, and on the backs of couches and chairs. I was also thinking about how absurd it was to sell baby sacks for $40 a pop! As I laid there, I realized that the solution to my problem was a baby sleep sack. Since I am very frugal, I decided that I would just have to make one of my own. Plus, I could put some use to those extra blankets laying around the house! Here is my step by step creative way of using things around the house to create my own baby sleep sack.
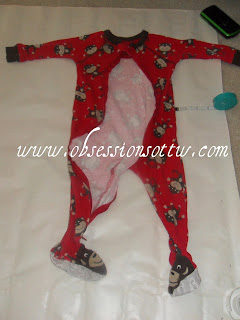
I started by getting out one of my son's footed pajama sleepers. I unrolled some wrapping paper. (I usually use butcher paper to trace patterns, but I didn't have any. Plus I had been wrapping Christmas presents that morning and thought that it was quite the creative solution.) I laid the sleeper on top of the backside of the paper. I traced an extra 3-5 inches around the bottom and up the sides.
I traced 2 inches under the arms and around the yolk. Then I made the straps 2 inches wide by 6 inches long. I cut it out and this was my pattern!
I laid the blanket out on the floor and found that I could make 3 full sacks with it (6 pieces cut out). I laid the pattern on top and cut out the first piece. Then I took that piece and used it to cut out the remaining pieces. The reason I did this is because the fleece would stick together as I cut, so it was less of a hassle than trying to hold the paper in place because I really hate to pin.
Then I took two pieces and put them on top of each other with the outside facing in. I sewed from one arm, around the bottom, to the other arm. I turned it inside out and Viola! It was done!
Here is the finished product. I thought about using buttons on the straps (and I might as he gets bigger), but when I tried it on him I found that it was much easier to just tie the straps. He absolutely loves them and hasn't woken up in the middle of the night since we started using them. The whole thing from making the pattern to finished product only took less than an hour to do. I was amazed with how easy it is. You could easily add a zipper or buttons if you choose, but this works very well.
If you don't feel like the creative type, but want to get a sleep sack for your little one; I did find a great deal on Amazon for them. Halo Innovations SleepSack Wearable Blankets Micro Fleece in Baby Blue - Medium


That is awesome! Elijah loves his sleep sack but is about to outgrow it. I may have to be a little creative and give this a try.
ReplyDeleteKeep up the great work!
That's great! I couldn't believe how easy it was. I am thinking about making up a few more to have and possibly giveaway...... I guess we'll see after the first of the year!
ReplyDelete